I had previously done what many model railroaders do: built and re-built and destroyed and started over multiple layouts in multiple locations: the garage, under my bed, and even lowered from the ceiling; but none "stuck". And I played with large scale (outdoors), HO and N scale and even had a fairly decent NTrak module finished before I got rid of it. Finally, In 2011 I decided I couldn't wait 10 years for my kids to move out before I got to build a "real" train layout -and that I had to either do it once and for all or give up on the hobby all together. So I took three feet along one wall of my daughter's 15'x25' bonus-room/bedroom and began my n-scale Denver & Rio Grande Western Railroad. The inspiration came from Mike Danneman's n-scale Rio Grand Moffat Road layout based on the DRG&W line from Denver though the Moffat Tunnel into Winter Park, Colorado. His modeling skills are so impressive I couldn't help but imagine a similar layout of my own, though I knew I didn't have the time, money, or skills to do it justice. I knew I would have to limit the myself but wanted a train layout.
PHASE 1 -DENVER: Using 1"x4"s I built a basic box frame that was anchored to the wall on two sides and held up with 2"x2" legs in the front. Other 1"x4"s were put in as cross braces to support the top. The top surface could have been foam but I went with thin, high-grade plywood. Six dressers beneath the layout provide storage for tools and materials. This first stage of construction was a simple 3'x15' rectangle along the east wall and allowed for a simple loop so I could run one train while I worked on the city (Denver) portion of the layout. There is enough to keep me busy for years just working on the streets, buildings, and populating the city with people and scenes. It truly is a hobby for a lifetime!
The Union Station was a kit I built in early 2012. I also purchased a scale "Union Station" LED sign that I custom installed into the roof of the station. I didn't want to simply place the control box on the roof of the station so drilled a rectangle hole for the on/off switch and a small round hole for the "mode" button. They now look like something that belongs on a rooftop. The sign has dozens of options to changing what letters or words flash, how long they flash, and in what order they flash.
So I ran one train in a loop while I continued to work - maybe once a week for a few hours - but then it hit me: I was spending more time imagining the future of the layout than I was running trains. Why wait ten years? What if I didn't live another ten years? I was also more worried about about having a photo-realistic, super-detailed layout (someday) with trains following actual timetables and running through realistic terrain - than just playing with my trains. I was planning to have real street names, industries, and scenery, but all that detail was bogging me down. I think reading Model Railroader magazine was the cause of this twisted way of thinking. In every edition I read about and see photos of some of the best layouts in the world - by modelers who have everything nearly perfect. I always thought those magazines needed a column just for beginners - or those who just want to run trains and not worry about being "perfect".
Then my way of thinking was challenged further in late February 2013 when I visited a friend's layout from my church. It was the first time I had visited someone else's layout. He had a 10'x20' layout in his garage, a simple flat layout set up on sawhorses. He was so proud of his trains and layout, and while he did have some scenes with buildings, people, and vehicles, it was more a "toy" train layout than a "model" railroad. But what struck me most was how much FUN this layout was! We both watched as five different trains all ran at the same time, each with its own track, loop, and power supply, each train led by an old steam train with its own personality. Watching toy trains RUN was a lot of fun! And not once did I wonder where the trains came from and where they were going - or what industries they served and if they had the correct type of cars to serve those industries. None of that mattered. The trains were running in circles non-stop and were just plain fun to watch. Mike slowed them down and sped them up and we laughed and talked trains for quite awhile and just enjoyed his trains. I had found what my own layout was missing: FUN!
I returned home that night with more than a new idea about "playing" with trains. Mike had switched to HO trains 15 years earlier and wasn't using his old N-scale stuff anymore. He sent me home with a large box of all his N-scale stuff: steam engines, diesel engines, several dozen cars (rolling stock), buildings, people, vehicles, and more! What a gift and blessing. What a friend!
PHASE 2 - ELEVATED LOOP: I gave myself permission to play with my trains instead of just "modeling" them and that very next day built an elevated loop that goes nowhere - it just circles above and around the city. There are no stairs for passengers to reach the train. No train station. No reason for that train or track to exist other than to go around and around and be fun to watch. And that's my new philosophy. Trains are to be played with. I plan to add as many loops as possible in the space I have and not worry about a switching layout for now.


PHASE 3 -CROSSING
THE WINDOW: I used Woodland Scenics 4% incline sets to gain altitude and
cross the large window on the south end of the room. I knew this incline might
push my little engines, especially when pulling the entire 12-car California
Zephyr consist - and it did - but I wanted to gain as much altitude as
possible. It felt very much like a real railroading problem when my one
working diesel engines did not have the strength to pull the full Zephyr consist
up the mountain. I knew I needed a helper engine or two, just like the real
train did. And while crossing a window is not the ideal situation, it was
the best (and only way currently) to expand. I plan to
replace the curtains with a pull down shade painted sky blue, which will be
nice. And having trains visible from the road will be kind of fun
too.
PHASE 4 - WEST WALL: The route coninues to climb at 4% as it reaches the west wall and begins a large "s" curve for 20' heading north. Here the track splits, levels, and the westbound train curves right and across an old creaky trestle.
What I didn't do was mark the height of the benchwork all the way around the room - on the walls - before building. And despite my mediocre carpentry skills, ended up with benchwork that was about a 1-3/4" lower at the end than when I started. This required me to decide whether to leave it or make an adjustment on the last bench (and the difference hidden with facia later). I chose to adjust the height and make it the same as where I started because when entering the room you see the first section of benchwork on your left and the last section on your right. I felt they needed to be at the same height, even though the benchwork in the middle is lower. Hummph. Well, no one will be able to tell, especially when I install fascia all at the same height.
PHASE 5 - TRESTLE AND TUNNELS: After the westbound crosses the trestle it climbs again slightly and then "hits the wall". This was something I had been waiting for several years! Behind the wall is a nice-sized walk-in closet that has enough room for a hidden track and (someday) a small work and dispatch room. For now I punched a hole in the wall and ran track to a shelf in the closet. The track comes out a different hole and back down the S curves, across the window, and back into Denver.
I soldered each track as it was installed and will likely add additional electrical connections for better conductivity every few sections of track, even though my MRC Railpower 1300 power pack seems to be providing plenty of power, on clean track, to keep the trains rollin'. Having this loop finished is a terrific feeling of accomplishment and it's fun to watch the train serpentine up the mountain, through the tunnel, and back down again! However, a real-world problem arose: the California Zephyr was too much train for any of my engines to pull up the 4% incline so I had to reduce the consist dramatically. After purchasing two new Kato engines the full train was able to make its way up and over the pass for the very first time. It was very exciting!
There were now three independent loops of track with three separate trains: the mountain line, the Denver loop, and the elevated loop.
PHASE 6 - COAL LINE: Because I had decided to build a layout for FUN instead of pure realism, I decided to add a fourth line on the west wall. The challenge was that there were already multiple 1x4 risers holding up the other line and I had cut foam to fit in around these risers.
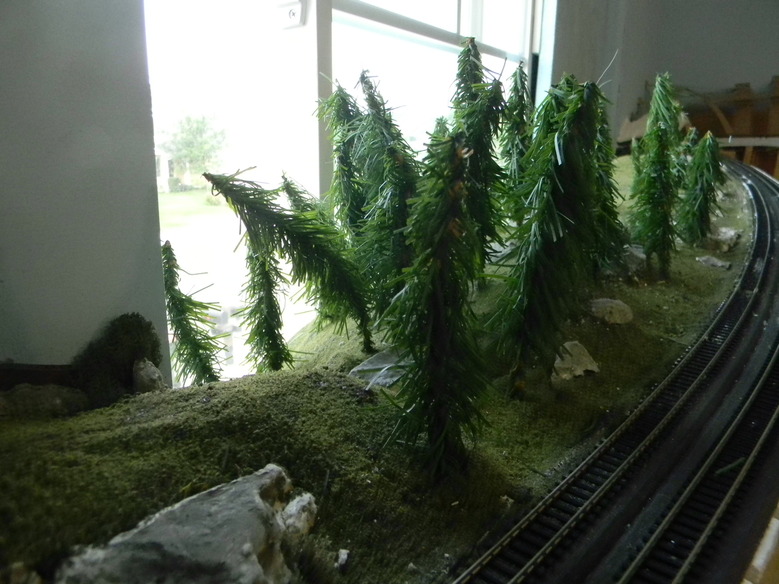
PHASE 7 - SCENERY: Cardboard strips were used to create the basic mountain shapes, then covered with just-add-water plaster, painted brown and covered with groundcover, bushes, and trees. Rocks were made using rubber molds and hydrocal. This step will take months if not years but is the most exciting part of the process. What started out as a simple track floating in space with nothing around it to make it look real is slowly becoming a miniature world that is only limited by my imagination and modeling abilities.
PHASE 4 - WEST WALL: The route coninues to climb at 4% as it reaches the west wall and begins a large "s" curve for 20' heading north. Here the track splits, levels, and the westbound train curves right and across an old creaky trestle.
What I didn't do was mark the height of the benchwork all the way around the room - on the walls - before building. And despite my mediocre carpentry skills, ended up with benchwork that was about a 1-3/4" lower at the end than when I started. This required me to decide whether to leave it or make an adjustment on the last bench (and the difference hidden with facia later). I chose to adjust the height and make it the same as where I started because when entering the room you see the first section of benchwork on your left and the last section on your right. I felt they needed to be at the same height, even though the benchwork in the middle is lower. Hummph. Well, no one will be able to tell, especially when I install fascia all at the same height.
PHASE 5 - TRESTLE AND TUNNELS: After the westbound crosses the trestle it climbs again slightly and then "hits the wall". This was something I had been waiting for several years! Behind the wall is a nice-sized walk-in closet that has enough room for a hidden track and (someday) a small work and dispatch room. For now I punched a hole in the wall and ran track to a shelf in the closet. The track comes out a different hole and back down the S curves, across the window, and back into Denver.
I soldered each track as it was installed and will likely add additional electrical connections for better conductivity every few sections of track, even though my MRC Railpower 1300 power pack seems to be providing plenty of power, on clean track, to keep the trains rollin'. Having this loop finished is a terrific feeling of accomplishment and it's fun to watch the train serpentine up the mountain, through the tunnel, and back down again! However, a real-world problem arose: the California Zephyr was too much train for any of my engines to pull up the 4% incline so I had to reduce the consist dramatically. After purchasing two new Kato engines the full train was able to make its way up and over the pass for the very first time. It was very exciting!
There were now three independent loops of track with three separate trains: the mountain line, the Denver loop, and the elevated loop.
PHASE 6 - COAL LINE: Because I had decided to build a layout for FUN instead of pure realism, I decided to add a fourth line on the west wall. The challenge was that there were already multiple 1x4 risers holding up the other line and I had cut foam to fit in around these risers.
PHASE 7 - SCENERY: Cardboard strips were used to create the basic mountain shapes, then covered with just-add-water plaster, painted brown and covered with groundcover, bushes, and trees. Rocks were made using rubber molds and hydrocal. This step will take months if not years but is the most exciting part of the process. What started out as a simple track floating in space with nothing around it to make it look real is slowly becoming a miniature world that is only limited by my imagination and modeling abilities.


Those
darn mice!